How to transform a bathroom in just one week
- Leoma Harper

- Aug 5, 2020
- 3 min read
Updated: Oct 16, 2020
The family bathroom hadn't been touched since moving to our home 5 years ago. Some how it was forgotten and used on a purely functional basis, as its main purpose was for the kids. Only recently, I realised it had so much more potential to look better, all it needed was a few tweaks and a splash of colour.

The bones of this bathroom were good ie the bathroom furniture and tiles, however it looked tired and bland, the paint work was peeling, accessories a bit dated and the tiles on the bath were badly cracked. Initially I looked into re tiling and giving it a complete revamp, but due to budget and the fact the kids would most likely mess it up within a few months, I decided to see what we could do with a lick of paint, some panelling and a few new accessories. Making the most of what we already had and giving it all a much needed lift.
Before

After

The colour was a last minute switch, initially I was looking at greens for this space, however, when patch testing these tones didn't feel right. I was immediately drawn to a beautiful smoky blue by Graphenstone, who had recently approached me to try out their gorgeous ecological natural paints. This bathroom revamp was the perfect opportunity to try out the GrafClean premium range, which due to being made from carbon fibres allows the walls to breath preventing cracks and is extremely durable even washable!


This paint went on like a dream, I absolutely love its matt finish and the Soft Smoke colour. I decided to add some simple slim panels to the walls in here, to work alongside the classic style tiles we already had. Having used this style before in the top guest room, I have seen how this simple addition gives an instant impression of character making an original plain space feel cosy and welcoming.


Marking out where we wanted the panels to go with a pencil, we measured out what dimensions were needed for the space and bought the boards cut to size from Selco (always get a bit extra) . We went for 6mm in depth and 7cm in width. You can get waterproof boards specifically for bathrooms, but unfortunately none were in stock and they couldn't tell us when they would be back, so we went for normal boards with a view to prime to protect. They were attached to the wall using HB Ultimate Sealant Adhesive and then secured with a nail gun. Followed by a good smoothing out with wood filler and caulking.

I decided to revamp the cracked bath frame with similar style panels going across. So using the same process as above, we added panels (minus the nail gun) to the tiles. Filled the cracks and primed the tiles and panels with Zinzer, then painted it up with the Grapehnstone Grafclean paint, which went on the tiles so effortlessly! It currently seems very strong on there, so I haven't added a sealant, as love the matt finish. We will see how we go, but as its wipeable and from what I have seen, 3-4 baths in, I am pretty sure it will be fine.


Before

After

I also decided to upcycle the sink unit, which looked like a big white box under the sink. It needed some depth to it, so I primed with Zinzer and painted it up using Fusion Mineral paint in Ash and added a simple handle from Dowsing and Reynolds to the front. This immediately gave it a more slick stylist look, that blending bathroom theme.


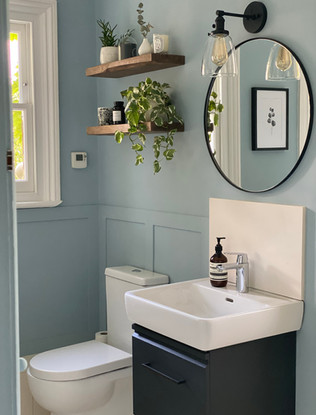
The little extras... Keen to tie in the black which works so well with this blue. I purchased a round black frame mirror from Cox and Cox to replace the old one and on discovering wiring for a light behind it, we added a wall light too. I found this one on Amazon after an extensive search to find a black framed wall light with an internal switch, due to no connection. The rustic shelves were an Esty find for extra storage. Wood always gives such lovely warm texture to a room and marries in the contrasting blues, blacks and silvers here beautifully.


Considering the minimal budget and how little has actually been changed in this room, I am so pleased with the result. It looks like a completely different room, a space that is a pleasure to use and walk in to, unlike its previously boring purely functional state!


Thank you for reading and I hope this inspires some simple makeovers. Its amazing what a lick of paint can do! Leoma xxx
Disclaimer: This post is part of a collaboration with Graphenstone Paint
which I used to paint up the walls and panels


Comments